Creating A Python Package
On Conjuring Up WebImage
I like putting pictures on my blog. But sometimes, it's kind of a hassle, so I skip it altogether. Then I end up having a whole blog post about my travels without any pictures to show off.
What a disservice to my readers!
So here's how I ended up creating a Python package to try to make my life a little easier and your reading a little more colorful.
The Problem
Most of my pictures from my phone are around 2 - 4 MB, with some even much larger.
At a size of around 4096 x 3072px, that's just too big to put on my website as is.
Ordinarily, if I want to share a photo or two, I have to open them up in some editor and quickly resize and save at lower quality.
It's not too bad, but if I have more than a few I want to share, I just don't want to do that for each one.
Additionally, I kind of want my pictures to look as good as possible on a big screen, but not to bog down the experience on smaller/mobile screens.
That's where responsive images come in.
Except that's even more work if I'm expected to create multiple copies of each image, and then reference those in some html like you see below (example from MDN):
<img
  srcset="elva-fairy-480w.jpg 480w,
	elva-fairy-800w.jpg 800w"
  sizes="(width <= 600px) 480px,
         800px"
  src="elva-fairy-800w.jpg"
  alt="Elva dressed as a fairy" />
I mean really?
The Search
So I decided to go on Mastodon and see if there was an existing tool I could use that would do this for me.
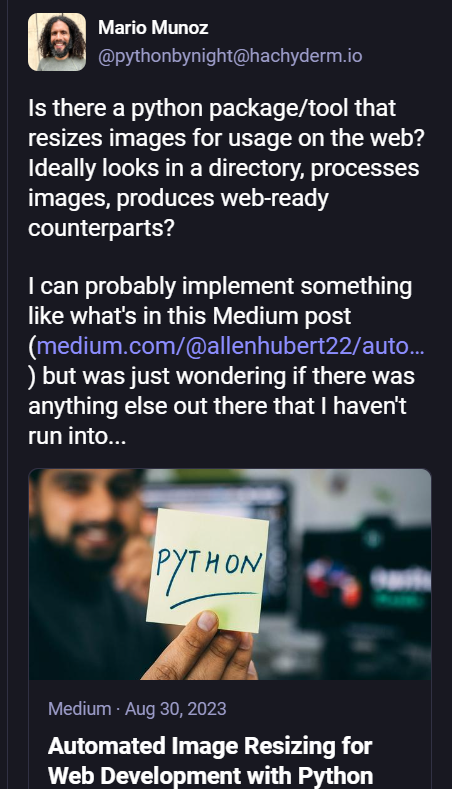
If I could find a tool to do this for me, then maybe I'd be more enticed to write out the HTML referenced above.
I was pointed to some rather heavy libraries, such as Pillow or scikit-image. Someone else referred me to ImageMagick, which definitely felt more like a chainsaw when all I was looking for was a pair of scissors.
The only thing I found was a script referenced in a Medium article that uses Pillow under the hood.
That was pretty close to what I wanted, but it wasn't something I could install and readily use.
The Idea
I figured I could write a local script or CLI app that could probably do what I wanted.
But this time, I started a little differently than I usually do.
Instead of creating a Typer app to hack away at, I decided to open up an empty markdown file and start creating a README.
I may have heard, in passing, the idea of Documentation Driven Design. I actually didn't know this weblink existed until I looked it up just now, but I felt pretty smart at the time.😁
I wanted to think about the ergonomics of using the thing I wanted to create.
Again, my focus was to reduce complexity.
The Prep
As I started on the document, this is how I envisioned the API:
from webimage import WebImage

img_path: Path = path/to/img.jpg

webimg = WebImage(img_path=img_path)

# Provide available stats of current image
webimg.stats()

# Creates default set of responsive images
webimg.render()

# Creates a single image based on sizes defined
# in settings ("small", "medium", "large")
webimg.render(size=small)

# Resize image (keep scale by only providing `width`)
webimg.resize(width=500)
As I worked on the documentation, I started looking a bit more at the Pillow library, which seems to be the default choice for image manipulation in Python, and it also has no sub-dependencies.
I mostly looked at the documentation for transformations that were relevant to what I'm doing, which is scaling/resizing.
As I looked at Pillow and continued writing my README file, my goals started to become a little clearer:
- Works on a single file, or all files in a directory
- Creates images in same directory, or can pass a different destination
- Allows ad-hoc resizing for just one image (small, medium, large)
- Optionally creates an html snippet for responsive images
The Work
I started with the WebImage class. I wanted one attribute to control operations on a single image, or all images in a directory.
It also has the flexibility to render at different, pre-determined sizes.
The actual transformations are performed by a separate Mage 🧙♂ class (get it?), which is where most of the Pillow logic is used.
And lastly, the HTML output is performed by an HTMLWriter class that handles composing the text that gets exported to a txt file.
While I am not dwelling on the details of how it's all built, the good news is that it is all open source, so you can check out the code yourself over on Codeberg!
As I was polishing up the package and trying my best to make it feel ergonomic, I realized that in addition to putting the code out there in some repository, I might as well make it installable like any other Python package.
Thankfully, this is something I have done before, but regretfully, it is not something I remembered too well.
(That's part of why I'm blogging about this now, so I don't forget how to do it later!)
The Packaging
If you've never published anything to PyPI, I understand the intimidation. Been there, done that. (And frankly, I'm still intimidated.)
The first thing I would do (if doing it for the first time), is I would make an account on TestPyPI, a place where you can go through the motions of publishing a package to begin with.
But I'll come back to that.
Let me start even before that.
In order to get my package ready to publish, I used uv. By default, when you use it to create your application, it will manage your pyproject.toml file with some necessary metadata.
But if you want to distribute your package, you will need to add a build-system section. It's also a good idea to edit the project metadata as it relates to your project.
# Check/update data in the [project] section
[project]
name = "myproject"
version = "0.0.1"
description = "Projects projectiles."
readme = "README.md"
authors = [
    { name = "Pinback", email = "pinback@example.com" }
]
...
# other stuff here

# add this section
[build-system]
requires = ["uv_build>=0.9.5,<0.10.0"]
build-backend = "uv_build"
...
# other stuff here
There are different build backends that you can use, but uv ships with one now, so I tend to use that.
There are other requirements for packaging and distributing projects, which is all explained in detail in the Python Packaging User Guide, but if you're using uv, chances are there's not much else to worry about on that end.
Once you've included the [build-system] section, sync your project again:
uv sync
Now you should be able to build the distribution files for your library.
uv build
This creates something called a wheel, in a dist directory, which you should probably add to your .gitignore file if it's not already there.
The Publishing
Okay, back to TestPyPI. If you haven't already, create/register an account at https://test.pypi.org/account/register/.
In order to publish, you will want to create an API token.
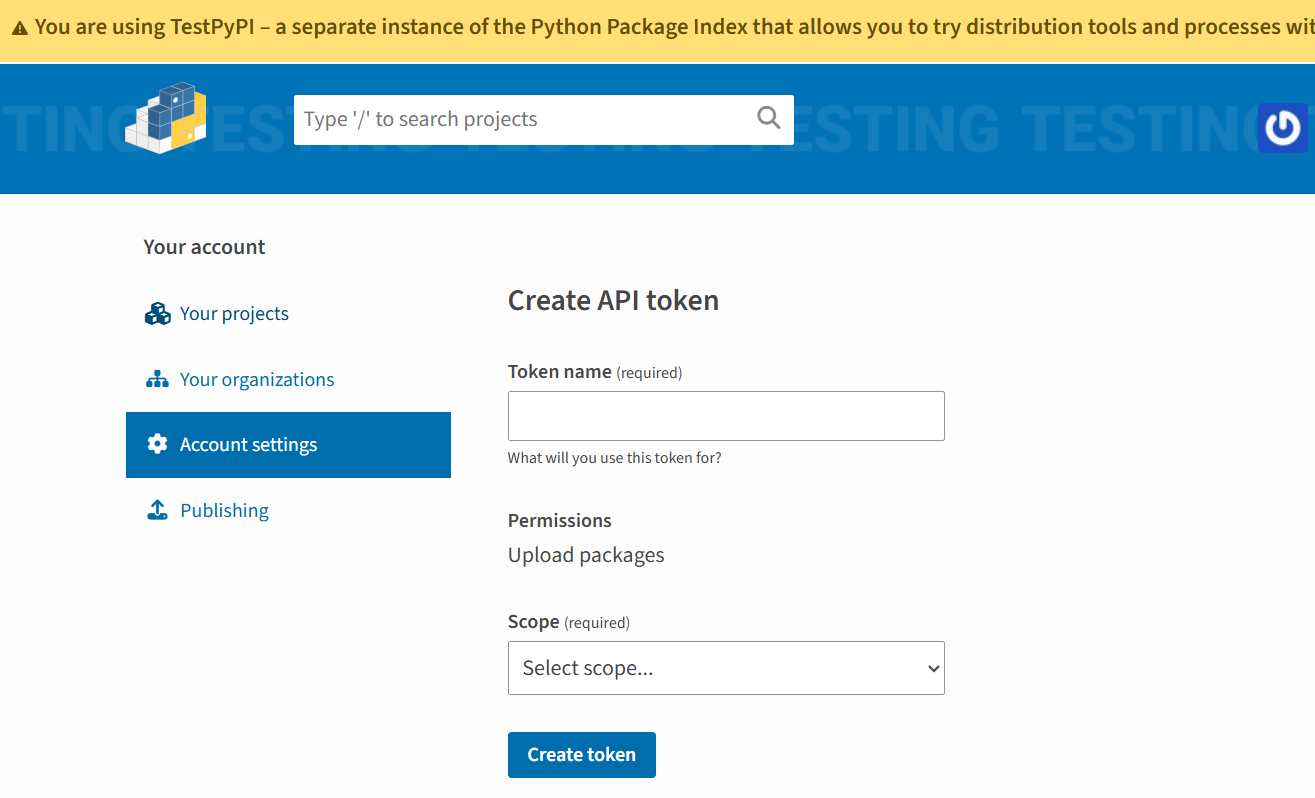
Choose a name, and select the scope for "Entire Account".
When you create your token, make sure you copy it and keep it in a safe place (i.e., a password manager).
Once you have your token, you're ready to publish your package.
The slightly more tedious way to do it looks like this:
# paste your token after the --token flag
uv publish --token pypi-xxxxxx-xxxxx
--publish-url https://test.pypi.org/legacy/
However, if you add the API token to a specific environment variable (UV_PUBLISH_TOKEN), you won't need to copy it in the command, and you would do this instead:
uv publish --publish-url https://test.pypi.org/legacy/
Personally, I use a tool called direnv which sets and unsets environment variables when I enter and leave a directory, which means I don't need to manually paste the token or remember to set the environment variable. 🎉
Once you've published, you should be able to search for your package on TestPyPI.
Publishing to regular PyPI is much the same.
However, keep in mind that you have to register for a separate account and generate a separate API key, as PyPI and TestPyPI do not share databases.
Once you get your API for "production", you can omit the --publish-url option from the build command, and uv will attempt to publish to PyPI directly
# enter API key manually
uv publish --token pypi-xxxxxx-xxxxx

# or if it's in your environment variable as UV_PUBLISH_TOKEN
uv publish
Since I already had tokens for both TestPyPI and for PyPI from last time, I was able to add WebImage to both without any issues.
Note that PyPI also supports "Trusted Publishing" which removes the need to use manually generated tokens, but these are only done through certain services (as of this writing, GitHub Actions, Google Cloud, ActiveState, GitLab CI/CD). However, I have not tried this method.
The Extras
While I spent a few days over the last couple of weeks thinking about what sort of tool I was looking for, it took me within a span of two days to build and publish something more or less along the lines of what I envisioned.
There are still some rough edges and some features I'd like to add, but for the most part, it works.
The "publishing" part was a lot quicker than I expected, even though I didn't quite remember what I did last time—undoubtedly the prior experienced helped, though.
But I'll admit that the combination of building a project with uv, adding a build system, then using uv build and uv publish made the process feel very streamlined.
There are a few other items I didn't mention.
Something new to me that uv helps with is managing your app versions. Sure, it uses SemVer (Semantic Versioning), but at least using that convention allows you to do a command like:
uv version --bump patch
This would bump your app version in pyproject.toml and uv.lock from v0.0.1 -> v0.0.2 for example.
And lastly, if you want to manage releases through your repository, you likely have to use a git tag of some sort.
Again, I'd done it before, but couldn't quite remember how. Thankfully, I recently installed lazygit, which also made that process less cumbersome.

The context menus really help here.
But wait, didn't I create a tool to automate my releases on Codeberg? 🤔
The Self-Referential
I ran a poll on Mastodon to see what I should name my package. I set it for 24 hours because I didn't think I'd have everything ready for release by the time it was done.
But I got a little impatient and decided to release it anyway. I'll likely keep it as WebImage (instead of the slightly more annoying, but punny WebiMage 🧙) but I'll likely keep some of the silliness here and there.
I know early on in my Python journey, the idea of publishing a package seemed distant, even with guides and tutorials on how to do that.
Many of them often felt like a "draw the rest of the owl" kind of situation.
I know there may be some of that in this post as well, but hopefully it provides a little more context.
Writing this post also helps it become more embedded in my own head and a gift to future me when I'm trying to remember why uv build is failing (hint: you forgot to add [build-system] to your pyproject.toml file).
As for actually using WebImage, well, maybe I'll eventually go back and add some vacation pictures!