A Place for My Things
Side Projects, Ahoy!
So I have a couple of side projects, and I want to put them somewhere.
In the past, they may have been scattered around in some random PaaS (platform-as-a-service), half-forgotten git repos, dusty local directories, and maybe on some scratchpad near my desk.
This is all fine. It's fine.
But as scatter-brained as I am, it makes it hard to pick up on any give project when I'm trying to remember where I left off.
One Roof
So I decided to gift myself a little cloud. 🌥
What do I mean by "cloud"?
For all intents and purposes, "the cloud" is basically a computer that isn't right next to me. A place where digital things live. Sometimes the cloud is physical hardware. Sometimes it's a "container" inside some other computer. You know, a virtual computer.
And what I mean by all that is that I chose to purchase a Virtual Private Server—or VPS for short.
Now my projects have a happy home!
How Do They Get There?
The thing about managing your own server is that now you have to do some of the hard stuff yourself. Having a server means twisting and turning the nuts and bolts of some OS (operating system) you may know very little about.
But hard doesn't have to be bad.
There are several vendors that offer VPS services. Prior to my big website redesign, I used Digital Ocean's App Platform to deploy my blog.
That is slightly different than having your own VPS because the vendor (Digital Ocean) handles the part of provisioning your server and deploying your application. (You know, the hard stuff.)
Digital Ocean does also provide VPS services in the form of Droplets, if you want to go down that route.
But when I started looking at prices, features, and server locations (as well as friendly recommendations), Hetzner seemed like the better choice.
Hetzner
I'll admit, setting up an account with Hetzner was a little awkward, as it required uploading a picture of my ID and verification from a real human—so it wasn't instant.
But once I got over that hurdle, setup was fairly straightforward. I knew that I wanted a virtual private server. The ability to create one was easy to find on their dashboard.
Next, it was a matter of stepping through various options, including the specs of my desired server.
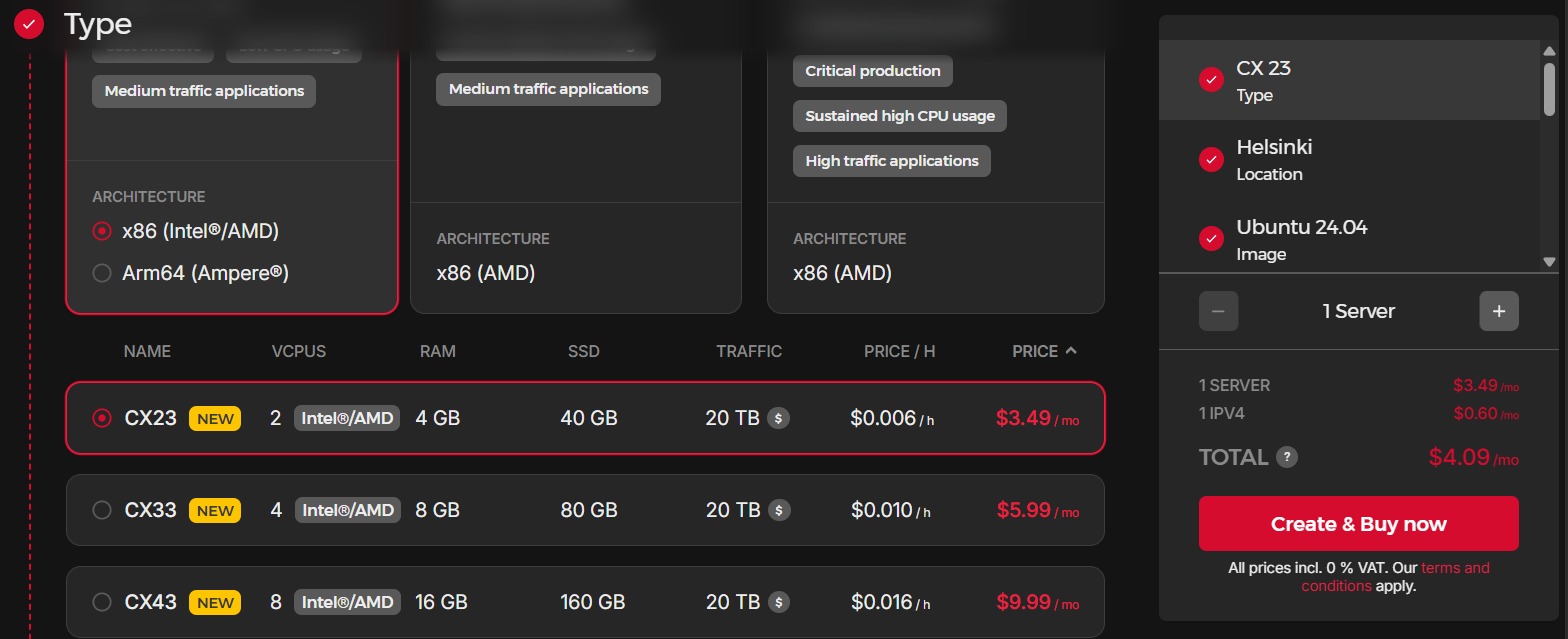
The prices, as of this writing, are very reasonable. For as low as $6/month, you can get 4CPUs, 8GB of RAM, and 80GB SSD with 20TB of traffic allotment monthly, with the caveat of "cost-efficient on older hardware generations." (This is the option I'd choose for most rinky-dink side projects.)
The same set of specs on newer hardware generations is around $12/month. Monthly costs vary based on hardware, specs, and location, but they are generally much lower than you'll find elsewhere.
(There is a small additional charge of less than a dollar for IPV4, but 🤷♂)
After selecting your Server and corresponding location, Hetzner gives you the option to select an Image. This mostly corresponds to some flavor of a Linux distribution (or operating system), such as Ubuntu, Fedora, Debian, etc...
It's okay if you don't have much experience with any of those.
That's because Hetzner also lets you choose from a list of "Apps" that come preinstalled in the Image.
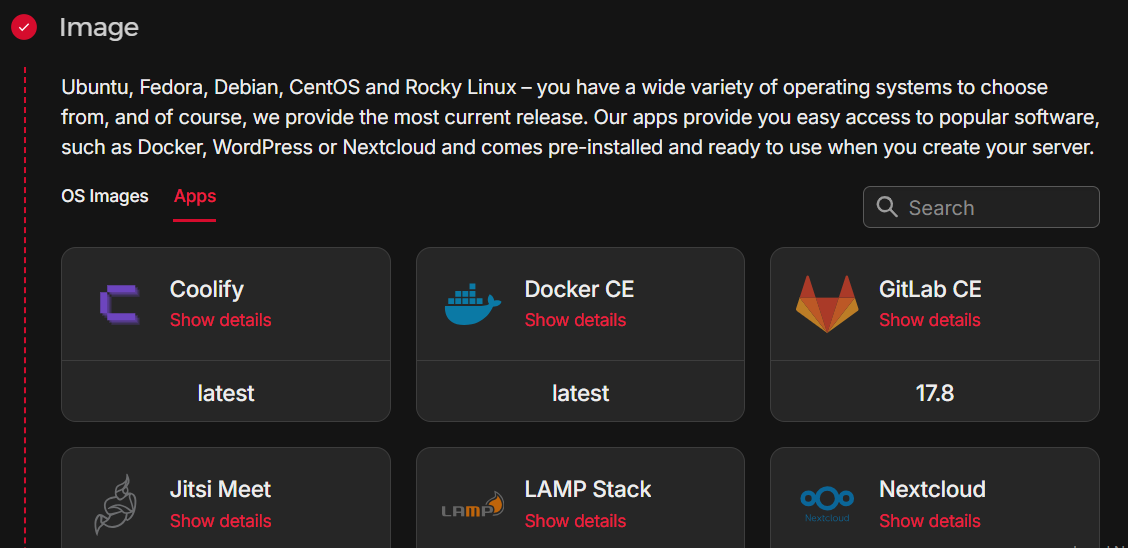
For example, you can choose an Image that includes Nextcloud, an open source collaboration platform.
But the one we're looking for is Coolify because it's 🕶 cool! I'll come back to that in a bit.
Next, there are a few extras that you can set up like additional volume storage, firewall settings, and a few other things, but you can skip those for the time being (you can always add/modify later).
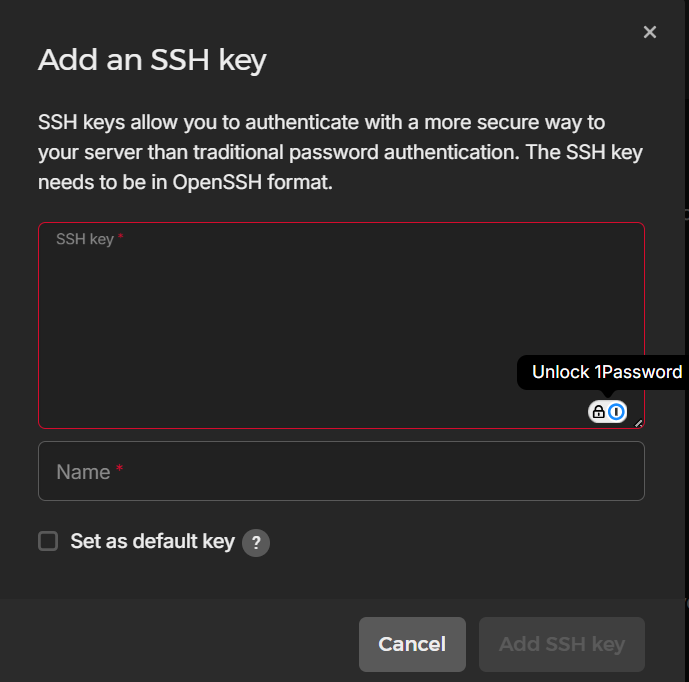
But then this is where hard mode comes in for those of us that are newer to this kind of thing, and it involves creating an SSH key. (You can do this as you are setting up your server, or after it's been provisioned.)
An SSH key is a personalized credential that allows you to communicate from your local terminal to your little VPS in the cloud—securely.
GitHub has a very good tutorial on how to create an SSH key.
If you've never done it before, it may help to look at different guides or videos if you prefer, but the methods will all be similar enough (slightly different on Windows vs other operating systems).
So when you generate an SSH key, this actually creates two files—one public and the other private. After you've created the key, copy the contents of the public file and paste that into Hetzner's "Add an SSH Key" dialog. (You can open the file in any text editor or, if available, use the cat command to pipe the the text to your terminal.)
And then, if you haven't already, go ahead and click on the "Create & Buy now" button.
What's In The Box?
Once your personal little cloud is operational, you should be able to access it directly through SSH.
Look, I'm not going to sugar coat it. If you've never messed around with SSH before, it can be a pain.
There are best practices that focus on ensuring security, but having to type in credentials all the time can get annoying—so look into configuration options for your SSH key and adding it to a thing called an ssh-agent.
But that particular rabbit hole is not for this post.
Right now, I'll assume you can get into your box with an SSH command.
Your Server (provisioned through Hetzner) will have a Public IP address assigned to it. You can find this through the Hetzner console/dashboard.
Once you have it, this is the command to connect to your Server.
# Subsitute "ip-address" with the one for your Hetzner server

ssh root@ip-address
This puts you inside of your VPS, executing commands as you would on your own machine.
With Great Power
At this point, the prudent thing to do would be to create a new user, instead of using root for poking around in the OS.
I don't want to spend too long on this part. Digital Ocean actually contains a good tutorial for how to do this. If you follow along, after you're done with step 5, you can exit your session as root user, and SSH in as the new user.
You can go ahead and create another SSH key for this user if you want to forego having to use a password each time.
For extra hard mode, once you've created your local SSH key for the new user, you can SSH into your server, navigate to (or create/mkdir) an ~/.ssh/authorized_keys file. You can use nano to paste the contents of your local public key into authorized_keys.
This should allow you to disable password login altogether (since you'll be accessing your server through SSH only), as well as remove the ability to log in as root. (Some of this is covered in that Digital Ocean tutorial referenced above.)
These are security measures that may seem over the top, but I'd say even for your rinky-dink side projects, it's worth trying to be as safe as possible.
Last word here: There are other avenues to handle user creation, including using cloud-init, which is supported by Hetzner upon initializing a server.
In short, it can automate some things such as creating users, user groups/permissions, and handling SSH key shenanigans as the server is provisioned.
I didn't go that route, so I didn't write about it, but there's likely more info on that floating around somewhere.
This post is not entirely exhaustive in covering how to secure your connection to your new Server, but at least it does give you a few avenues to follow.
Cool
Okay, moving on. So what's so cool about Coolify?
Coolify bills itself as a self-hosted replacement for other PaaS (platform-as-a-service) services, allowing you to easily provision databases, websites, applications, and nearly 300 services with "one-click installs."
Practically—that just means you have a dashboard that makes putting your rinky-dink projects wherever you damn well please.
You can manage other apps within the same VPS. Or, you can manage servers on other hosts (AWS/Digital Ocean/Hetzner, et al.), or even local hardware such as your own laptop or Raspberry Pi.
Since Hetzner took care of installing Coolify while provisioning the server, it should be ready for you to log in and set up.
Circling back to security, however, you should go ahead and setup a Firewall through your Hetzner account.
Coolify recommends keeping certain ports open which is easy to set up through your Hetzner dashboard. These are the Coolify recommendations:
- 8000 – HTTP access to the Coolify dashboard
- 6001 – Real-time communications
- 6002 – Terminal access (Required for Coolify version 4.0.0-beta.336 and above)
- 22 – SSH access (or your custom SSH port)
- 80 – SSL certificate generation via reverse proxy (Traefik or Caddy)
- 443 – HTTPS traffic
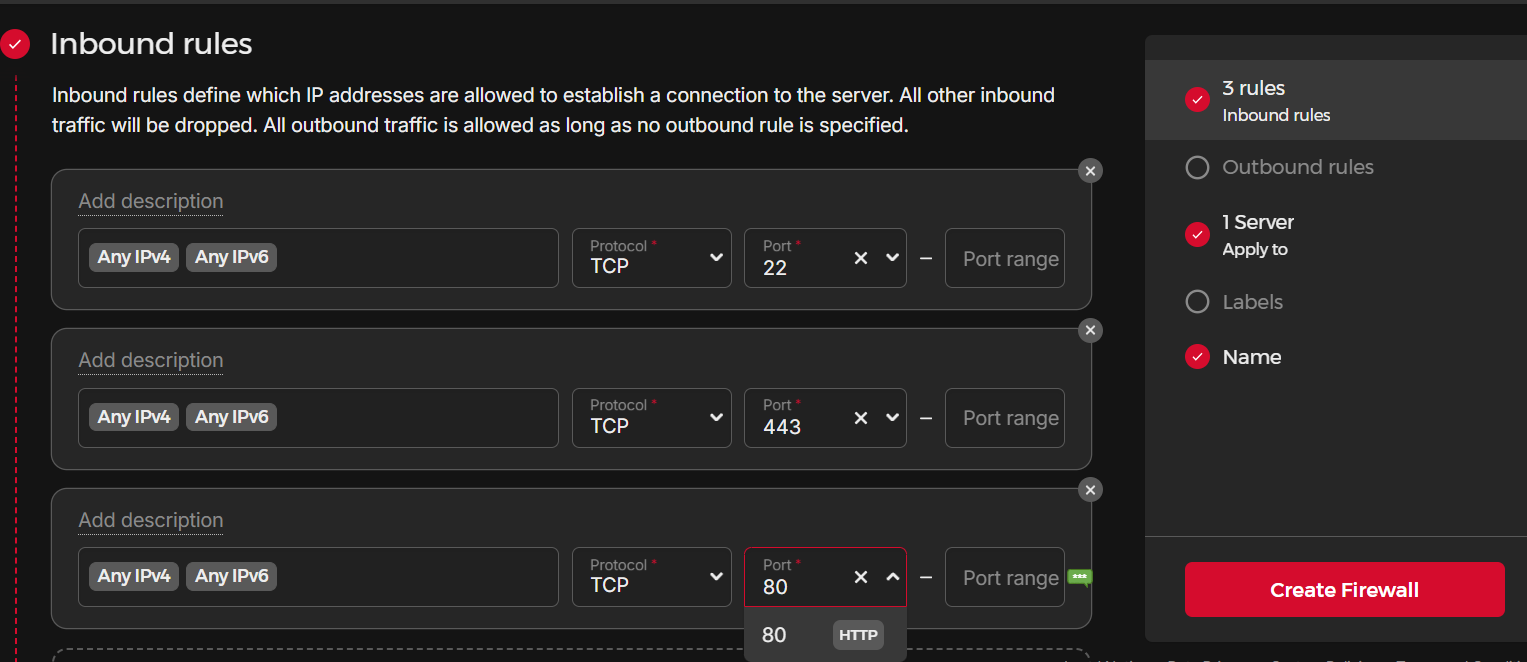
Once the Firewall is created, make sure that it's enabled for your Server.
Next, navigate to your very own personal Coolify instance.
This will be located on port 8000 of your IP address (i.e., http://203.0.113.1:8000 as an example).
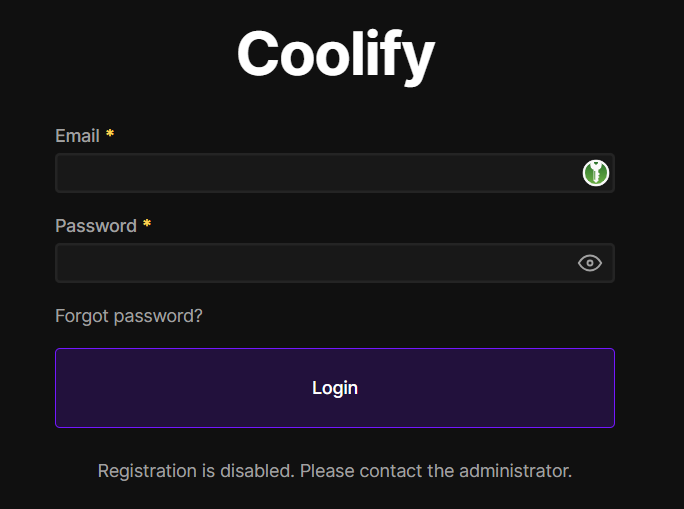
Visit this page and you will be redirected to the registration page, where you can create your admin account.
Once you've created your username and password, you'll be given an option of setting up as "Localhost" vs "Remote Server." This just means that your instance of Coolify will be running either on "localhost", or the VPS you've provisioned with Hetzner—or, you could choose another remote server.
The former (localhost) is what I'd choose if all you're going to be hosting are some rinky-dink side projects; a blog or webpage, some static sites, an analytics app (like Umami) and so on.
(This may also depend on what options you chose when choosing your VPS settings, or if you have one or multiple servers.)
Update: Jeff pointed out over on Mastodon that Coolify also offers a "Cloud" version for $5/month. This means you would not need to host it yourself on your own Server. The advantage here is that Coolify would handle all updates, and there's less risk of downtime in case something gets screwy with your instance. You also have access to better support. I think that the price is very much well worth it if you're interested in cutting down on complexity.
Configure Coolify
Once you have completed your admin registration, near the bottom of the left side menu is the link for Settings.
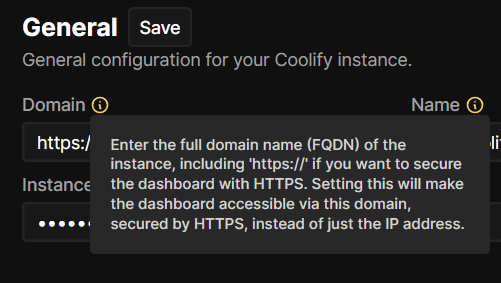
Here, you can link up Coolify to a domain you own. You can update DNS records through your registrar, or have Hetzner manage them, or something or another...
It's not unsurmountable if you're patient and follow directions, but that's a separate topic.
Needless to say, if you own your domain, and you've handled the proper DNS routing, you can use a domain to then access your Coolify instance (instead of just an IP address).
Next, on the Dashboard, you can select Servers and you'll see one called "localhost" which corresponds to your Hetzner VPS.
When you select it, you'll be taken to a configuration page for that specific server. This includes a "Wildcard Domain" field which is very handy. It allows you to receive a randomly generated domain (also configurable) for any new applications.
For example, if the wildcard domain is https://example.com, when you spin up a new application, Coolify will generated a domain like http://abc123doremiyouandme.example.com which will point to the new application automatically. (Note: the DNS for the full domain name of https://example.com should have a setting to allow for wildcard subdomains).
You also have access to further customize your proxy settings. If you don't know what this means, you're mostly fine.
But if you want to switch over from the default Traefik server proxy to something like Caddy, you can do that here as well. Further customizations to the default settings can be done directly through the Coolify dashboard.
Are We To The Cool Stuff Yet?
Admittedly, configuring and provisioning stuff is not fun for everybody. (I know some of you do enjoy it—you sickos. Just kidding, I'm one of you too.)
But now you have the ability to manage your projects from one place!
This is an example of what my dashboard looked like recently (as of this writing).
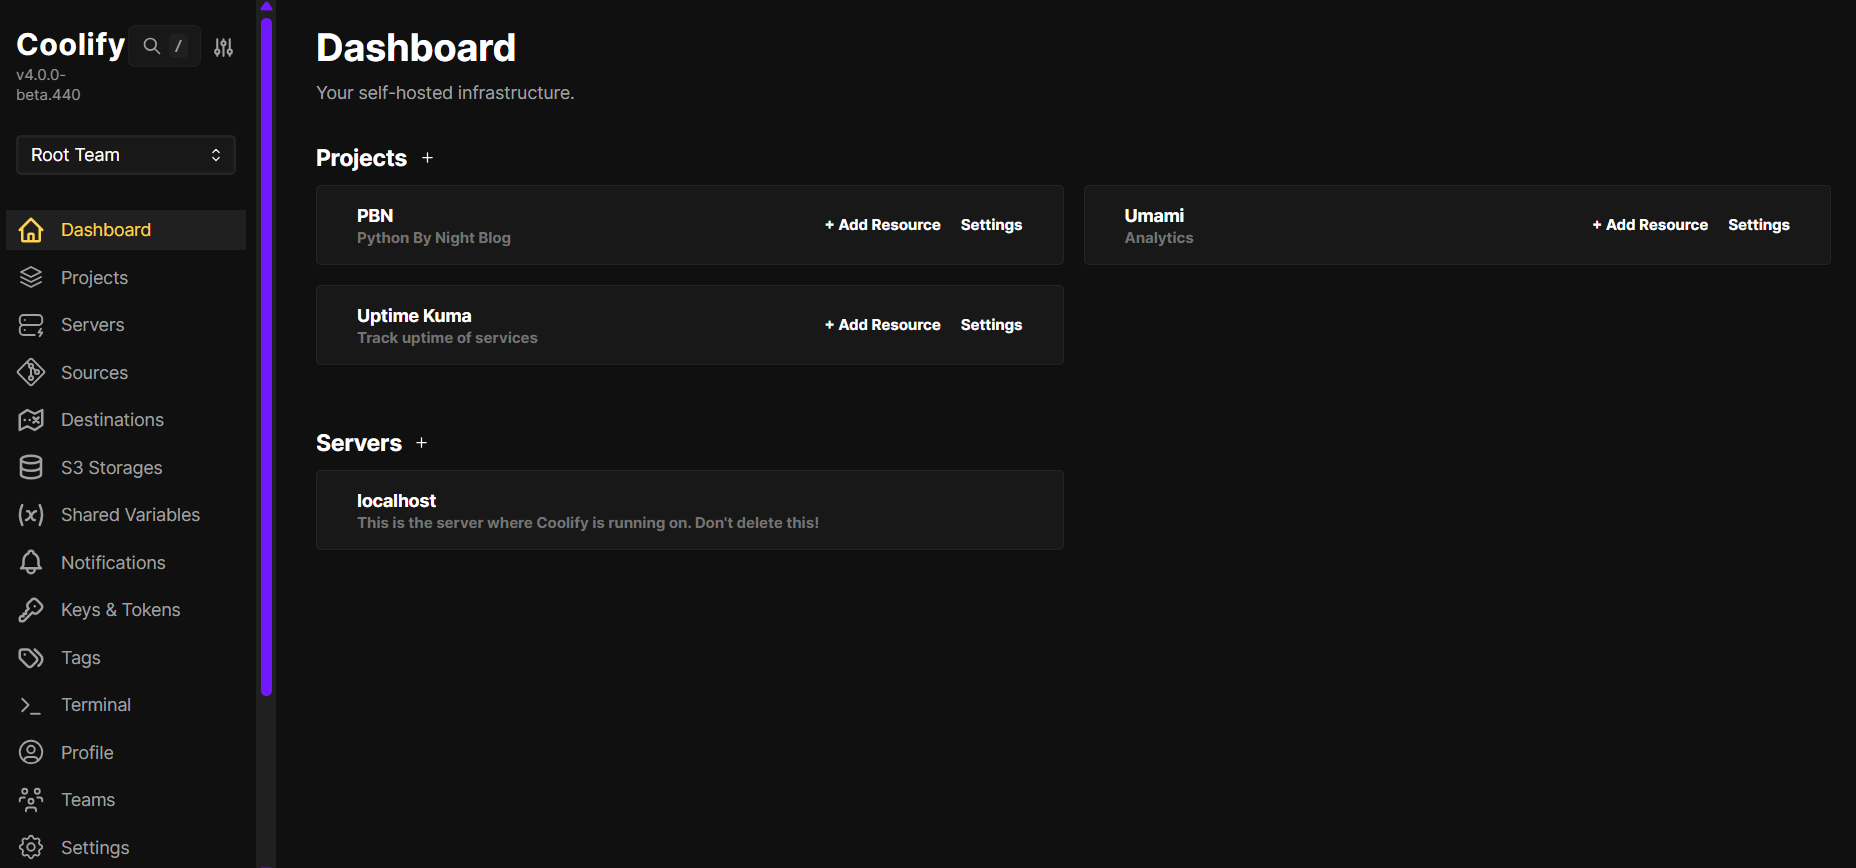
My main project is this completely and absurdly over-engineered blog, as well as a project holding an Umami (privacy-focused analytics) instance, and another with an Uptime Kuma (self-hosted monitoring) instance.
You can add a project by clicking + next to Projects, or navigating to the Projects menu item. After giving your project a name, Coolify creates a "production" environment, where you are then able to add Resources.
A Resource represents anything that you can think of to put in your docker container. This can be your web application, static site, a database, or plethora of other services.
The most likely resource for a project will be a Git repository. If your repository is public, it is extremely simple to set up. If you have private repositories, this may involve adding a "Deploy Key" to be able to connect to the API (similar to the earlier SSH shenanigans).
You can also build off of an existing Dockerfile or Docker Image or directly from a Docker registry.
Coolify is generally containers all the way down. If your resource is a git repository, it will ask you what to use as the "Build Pack". This is where you can tell it to use Docker or Docker Compose (based on whether you have that set up for your application already).
If not, it will attempt to deploy either using a "static" setting (telling Coolify to build your image with a static web server), or using Nixpacks.
Using the latter means that Nixpacks will analyze your codebase, looking for specific files that will tell it what kind of Docker image to provision.
I have not personally tried this, but it does seem to solve another source of headaches for folks who may not be too sure how to create their own Dockerfile.
But once you've chosen the Build Pack, you'll be able to Deploy your application.
Databases and Services
It's not just applications that you can spin up as Resources.
You can also click on a button to provision databases, such as PostgreSQL, MySQL, MariaDB, Redis, MongoDB, and more.
This is great if your app relies on having one of these resources and it has not already been included in the aforementioned build process.
Additionally, there are nearly 300 services which you can also spin up as a Resource for your project.
For example, I created a Project for analytics and decided to try out Umami.
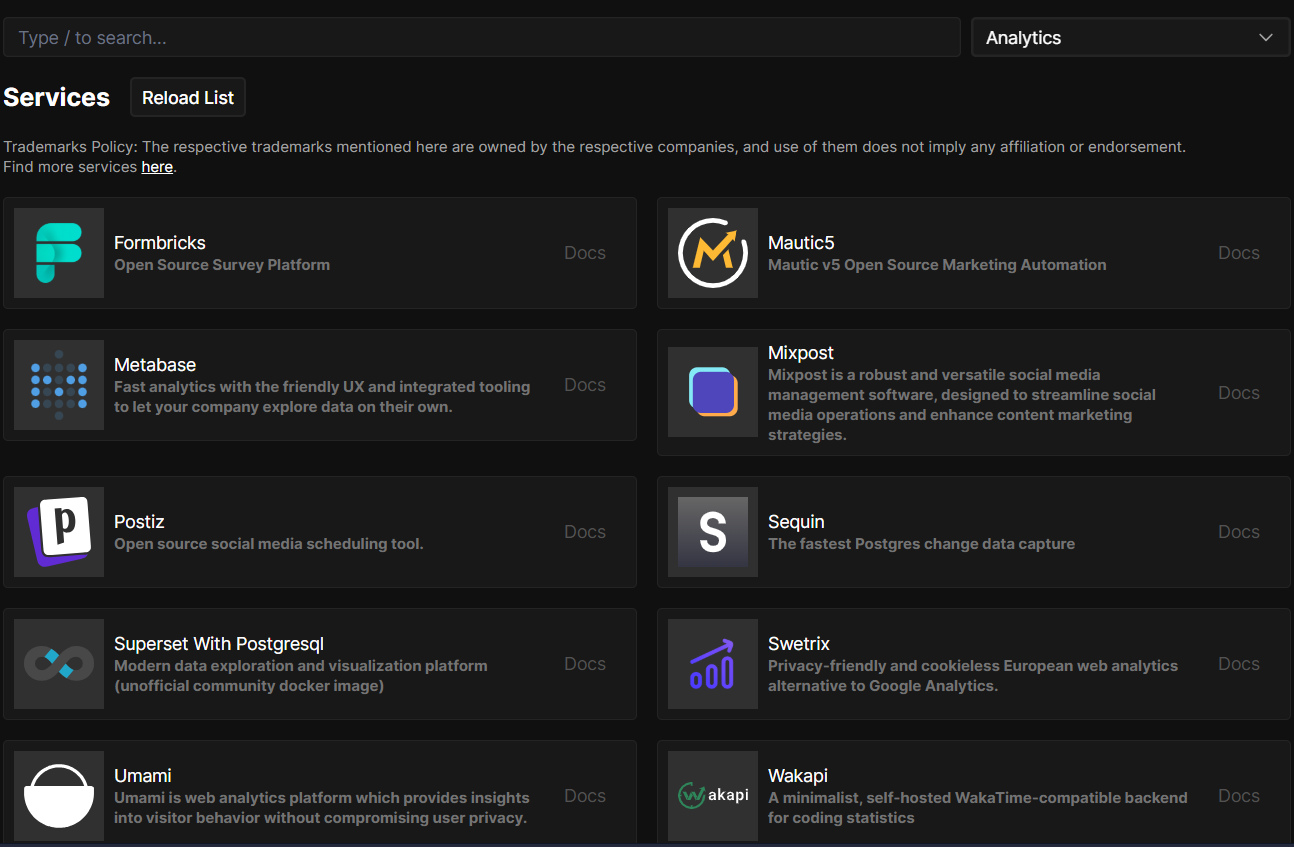
You can search for a specific service, or filter by categories from the dropdown on the top right.
For example, the above screenshot shows several of the different options you can choose from under the category of "Analytics."
When you select any given service, you'll be taken to a configuration screen which allows you to make any changes to defaults, but generally, you won't need to change anything, especially if you're just trying something out.
I was able to select Umami, click on a few items (and also select a specific subdomain), and then Deploy. It was up and running within a minute.
So What You're Telling Me Is...
Once you have Coolify running, the friction that you would otherwise have for "deploying" a personal project is greatly reduced.
Do you have a project idea that requires a PostgreSQL database? Just a couple of clicks from Coolify and you'll have a working database with credentials that you are able to view (and change) from within your Dashboard.
Want to see what your application looks like IRL? You can also deploy it with Coolify!
One of the pain points I see here is having to think about each of your projects as a Docker image. That can feel daunting, especially if you haven't dabbled too much with it in the past.
But the tradeoff of being able to manage things with Coolify is pretty convincing.
A lot of this is kind of hard to conceptualize until you're kind of able to see it, so I've tried to diagram what a typical setup might look like.
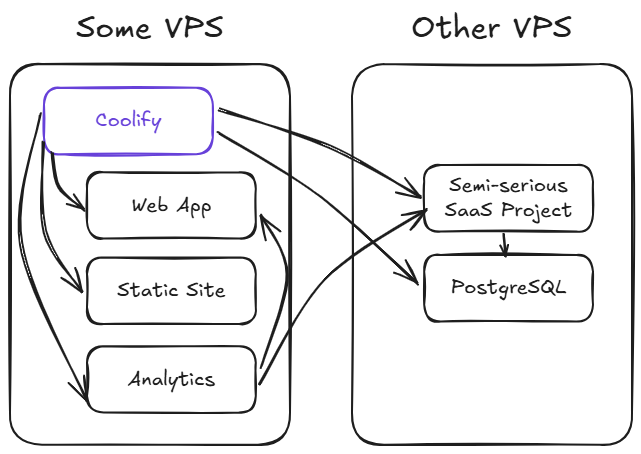
Here, Coolify has been used to provision a Web Application and a Static Site on the same VPS that hosts the Coolify instance. The same server also has an image running an analytics application (like Umami, for instance).
This may be alright for most circumstances, but it depends on what your VPS configuration is like. If you went with the one referenced above on Hetzner (4CPU/8GB RAM/80GB), this should be fine.
However, let's say you have a side project that is not as rinky or dinky as before, and you're thinking of launching a more serious SaaS application.
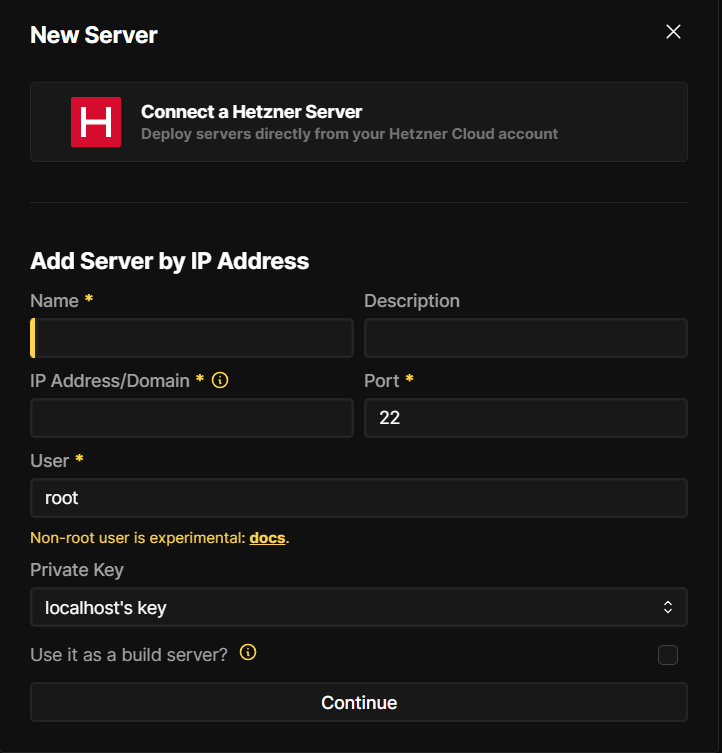
You can spin up a new, isolated server (on Hetzner, or any other provider). (Note: as of fairly recently, you can actually do this directly from within your Coolify instance.)
Now you can manage your new application and a related database, all hosted within the newly provisioned server. And since you are self hosting your analytics platform, it's no trouble linking it to your semi-serious project as well.
Side Projects Rejoice
There is still a lot I haven't covered in terms of what you can do with this type of setup.
And I'm sure it might be a little bumpy getting everything dialed in just right.
But I believe in the end, it's worth it. Your side projects deserve more than to lie dormant in a forgotten repository, or lost in an outdated directory on your computer.
Now you can actually give them a chance to breathe "in real life" and receive the time and attention they deserve.
And you know what, if it's not working out, you can just as easily remove the project from your Dashboard, and give it a proper sendoff and meaningful goodbye.
Last Thing
One last benefit I want to point out is that with this sort of setup, you may also have an easier time weaning yourself off of big tech dependence.
With the plethora of Coolify services available as "one-click installs," you have the ability to try out many alternatives to tools you've become dependent on.
Want to ditch MS Office or Google Docs because reasons? You can try out a version of LibreOffice. Thinking about ditching Google/Amazon photos? Just one-click install Immich.
Not everything may stick, but at least you have options, and you're in control of your data and creative output.
It's strangely empowering!
Hopefully some of this has helped. Now get out there and give your rinky-dink side projects a chance.